Tuesday, July 9, 2019

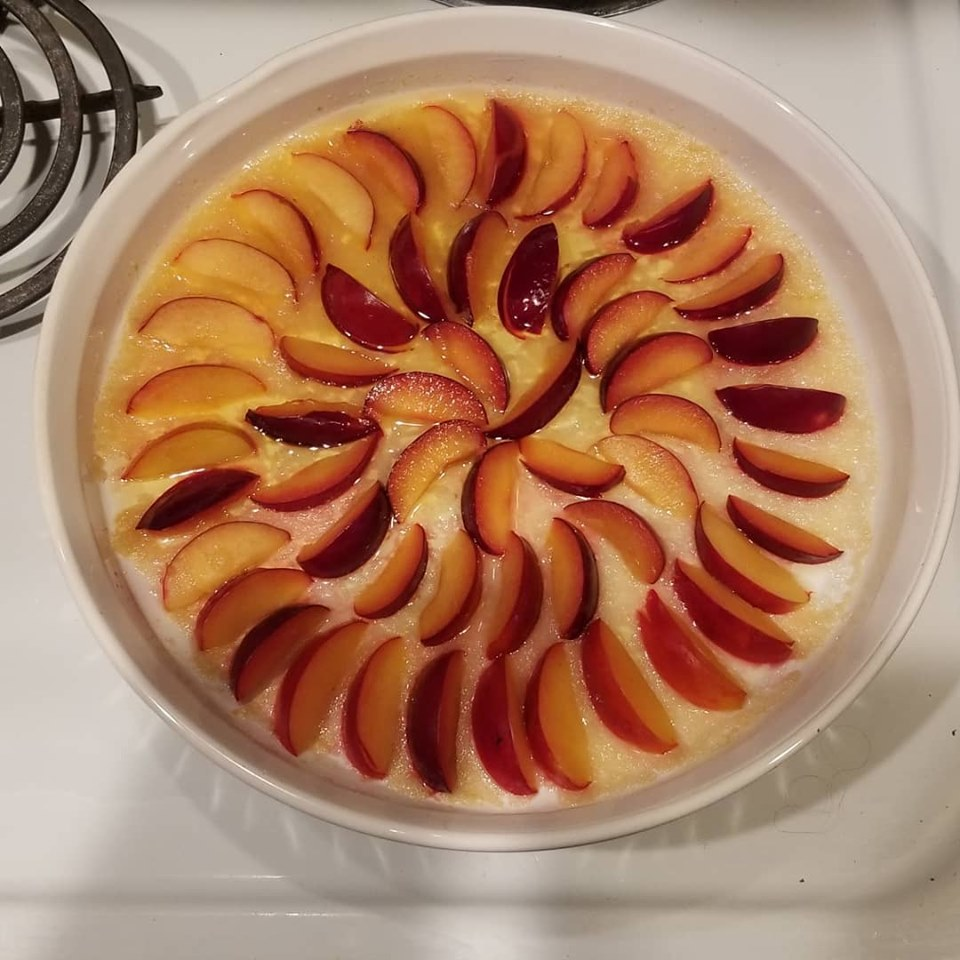
Plum Upside-Down Cake

Plum Upside-Down  Cake
I am a basic cook and baker, for the most part. I love doing both. I love learning about flavors that go together well, and I love the creativity of layering compatible flavors to make something beautiful and tasty! 

This, like many of my creations, was an experiment...one that, happily, turned out really well! Using a boxed cake mix (we love Trader Joe's brands!) makes it really simple! Mixing it up took me about 10-12 minutes probably. The hard part, as always, is smelling the deliciousness and waiting for it to be done so one can EAT it!

I hope you try this one, and I hope you like it as much as we do! The topping is just tart enough to balance with the sweetness of the cake. A little ice cream or whipped cream would also compliment this cake well.


Topping Ingredients:
½ sticks butter, cut into smaller pieces for melting
¼ cup sugar (more or less to taste)
½ tsp. vanilla
½  tsp. almond extract
8-10 small to medium plums (I used yellow flesh plums), sliced in wedges

Cake Ingredients: 
1 box Trader Joe’s Vanilla Cake and Baking Mix
1 stick butter, melted
2 large eggs
1 cup cold milk
½ tsp. vanilla
½  tsp. almond extract


Directions:

Preheat oven to 350 degrees.

In a 9-inch square or a 10-inch round baking dish, place the half-stick of butter, the sugar, and the two flavorings, and set the dish in the oven as it’s preheating. Set your timer for 5 minutes.

Meanwhile, mix the stick of melted butter (not hot), the two eggs, and the milk in a large bowl. This can be beaten or whisked, but mix until the batter is smooth. Mix in the two flavorings thoroughly. Add the baking mix and stir or whisk until smooth.

At the 5-minute mark, remove the melted butter mixture from the oven and stir until mixed will. Arrange the plum slices in the bottom of the dish directly in the butter mixture, in whatever design you like. Carefully pour the batter over the plum arrangement so as not to move them around.

Bake in the 350 degree oven for 35 to 45 minutes. Remove from the oven when golden brown, and a cake tester comes out clean.

Cool a bit before slicing.

ENJOY!

Sunday, March 10, 2019

ANTI-INFLAMMATORY GOLDEN MILK

(With special thanks to Vince Lombardi!)


My friend, Vince shared this with me almost 7 years ago. I started using it, and in a couple of weeks, I noticed how my hands and feet had stopped hurting…almost completely! Before that, I had basically learned to live with almost continual pain in both hands and both feet all the time. I  have also proven to myself that this stuff, when I  use it properly each and every day, keeps me from getting diverticulitis. I am also convinced it boosts my immune system incredibly, because I don’t get colds, the flu, etc., even when it’s all around me. I will also tell you that I tried, on several occasions, to take turmeric pills or capsules…even the ones with black pepper….to replace this mixture, but it wasn’t nearly as effective! In a few days, my pain would return, and on two different trials of the oral medication, I actually got diverticulitis.

This recipe is actually doubled from the original. I guess it lasts me a bit more than 3 weeks. Most research says that turmeric has to be heated to be effective, and it should be mixed with black pepper to make it more bioavailable to our bodies. Ginger is added here for its anti-inflammatory properties as well as its flavor.


 Ingredients:
  • 4 cups of filtered water
  • 1/2 cup of turmeric powder (I use organic or high quality brand turmeric powder)
  • 4 TBS of dried ginger powder (optional, add more or less to taste, another great anti-inflammatory)
  • 2  teaspoons of ground black pepper

  • 1 cup honey (raw, organic and unfiltered)


Step 1: The Concentrate
  1. Bring water to a boil in a sauce pan – then turn to slow boil.
  2. Add all ingredients to slow boiling water, except for honey, and mix well.
  3. Maintain a slow boil and stir periodically as the mixture thickens a bit.
  4. IMPORTANT:  It is important that the water slow boil / cook for about 20-22 minutes to allow the curcumin to go from 1% in solution to 12% in a bio-available solution. You may notice that every few minutes, you will need to drop the heat back a bit, since the bubbling can create quite a mess on the stove around your pot.
  5. After 22 minutes, turn off the heat, allow the mixture to cool to lukewarm, and add the 1/2 cup honey, and mix well. 
  6. Place in a 1 quart glass mason jar and allow to cool then store in refrigerator. (Note: I usually stir the mixture really wall, and then run it through a larger mesh strainer before putting it in the jar, just to be sure there are no large lumps.)

Step 2: Golden Milk (good hot or cold!)
Ingredients:
  • 1 cup of almond milk (I use an unsweetened organic almond/coconut milk)
  • 2  TBS (tablespoon) of the turmeric-honey concentrate from mason jar (provides nearly a tsp of turmeric– stir before dispensing from mason jar).
  • 1/2 tsp. vanilla extract
  • 1 tsp. organic agave syrup
Note here that I have, for the last couple of years, doubled up the mixture in my almond milk each morning. So, I use the same 8 oz of almond milk, but I mix it with about 4 tablespoons of the golden milk mix. I stopped using the vanilla and agave some time ago, because I found I really don’t mind the taste of the golden milk at all, and I can save calories and money!

Sunday, March 4, 2018

FRESH ROMA TOMATO PIZZA SAUCE

Anyone who knows me knows I'm a pizza freak! I could eat pizza every day! I have never met a pizza I didn't like! So, in my efforts to eat healthier, I began to make my own pizzas at home. By make my own, I mean, I was making my own dough. I still bought sauce from the store. Oh, sure, I buy organic pizza sauce, but I kept thinking I should be able to make my own! So, about a week ago, I started reading article after article about making pizza sauce.  I made a few mental notes about ratios, the best kind of tomatoes to use, etc., so that when I started, I would at least have some base knowledge.
Yesterday, a stop at Lidl grocery store, one of my favorites, proved to be my incentive, when I found a great price on beautiful fresh Romas!


FRESH ROMA TOMATO PIZZA SAUCE
  • 2 pounds fresh Roma tomatoes
  • 2 tablespoons extra-virgin olive oil, divided
  • ½ large onion, chopped
  • ¼ small red bell pepper, chopped
  • Sprinkle of salt
  • 2 tbsp. garlic, minced
  • ½ teaspoon dried basil
  • ¼  teaspoon dried thyme
  • ¼  teaspoon dried oregano
  • ¾ teaspoons salt
  • ¼ teaspoon freshly ground pepper
  • 2 tbsp organic sugar
  • 2 tablespoons tomato paste
Heat a large skillet on med-high with 1 tbsp of the olive oil. Sauté chopped onion and pepper  with a sprinkle of salt until soft.  Add the garlic and continue to sauté until cooked through. Meanwhile, halve or quarter the Roma tomatoes and toss into a super blender or food processor. Blend until completely smooth. Spoon the cooked onion and pepper mixture into the blender and blend until fully incorporated. Pour the tomato mixture back into the large skillet and heat on med-high again, stirring constantly. Add the basil, thyme, oregano, salt, pepper, sugar, and tomato paste. Bring to low boil, cook for several minutes, and then lower heat and simmer for a half-hour or so, until most of the water is gone, and you are left with a nice thick sauce.
I cooled the sauce and used small jars to measure out pints, then put the pints into freezer bags and froze flat on a tray, so as to be able to stack them in the freezer.
Note: You may want to play with and adjust some of the spices a bit to taste. I like a sweeter sauce, so I used a bit of sugar. I don’t like thyme very much, so I started with only a small amount. This sauce turned out pretty good, although I haven’t made a pizza with it yet. I did, however, have a dab of my favorite store-bought brand in the fridge, and I used that as my reference!

Tuesday, December 19, 2017

SHEET PAN SCOTTISH SHORTBREAD


 I have always LOVED shortbread! For years, I baked various kinds of 'shortbread cookies,' but as much as I liked them, they never quite hit the mark. 

I came across a recipe recently for shortbread made in a sheet pan. The recipe sounded intriguing, except that it called for rice flour. I already have about 5 kinds of flour in my kitchen, none of which is white rice flour, so I started researching to find out if I could substitute something for the rice flour. Everything I read said that the rice flour imparts that specific light crumbly texture of true shortbread, and should not be left out or substituted. 

SO, of course, I got the rice flour! I stopped by THE MARKET in Woodstock, Va, because they have a full line of Bob's Red Mill baking products, and I got a small bag of white rice flour. I am not sorry I did! 

This recipe, altered a bit from the original, is as near perfect a shortbread as I've ever eaten! I love it! I hope you try it, and I sincerely hope you love it too!

INGREDIENTS
·      1 ¼ pounds (5 sticks) salted butter, room temperature
·      1 ¼ cups granulated sugar (I use raw organic sugar, which I believe contributes to the crispy texture)
·      1 tsp. vanilla extract
·      1 ¼ cups white rice flour (like Bob’s Red Mill…non-GMO)
·      4 cups unbleached organic all-purpose flour
·      2 tbsp more of the same raw organic sugar for topping

HOW TO MAKE IT
Preheat oven to 275. In a stand mixer, beat butter and sugar on medium speed with the paddle attachment until well-blended and fluffy. Add the vanilla. Add rice flour and beat on low speed until incorporated, scraping bowl as necessary. Gradually add the AP flour, beat on low until blended, again, scraping the bowl as necessary.

Line a 12 x 17 rimmed baking sheet with parchment paper. Turn the dough out onto the lined baking sheet and press or roll until very even and smooth. Sprinkle evenly with 1 tbsp of the topping sugar. Bake until shortbread is golden in the center, 60-65 minutes. Drape shortbread with another sheet of parchment and continue to bake until a finger pressed lightly in the center leaves no imprint, about 20-25 minutes more.

Set shortbread on a cooling rack and sprinkle with the remainder of the topping sugar. While hot, cut into 1x3 rectangles or 2 inch squares. A baking scraper works beautifully for cutting. Let cool completely in the pan.

Keep in airtight container at room temperature up to one week, or frozen, for up to 3 months.


Monday, September 11, 2017

SLOW COOKER APPLE BUTTER

Slow Cooker Apple Butter

Yield: At least a half-gallon
Prep Time: 1.5 hours
Cook Time: 10 hours
Total Time: 12 hours 30 minutes

An easy recipe for Apple Butter, made right in your slow cooker!

Ingredients:

6½ pounds apples, peeled, cored and sliced (I used a combination of Golden Delicious,
Fuji and Galas. Also, I will tell you that it’s approximately 25 medium-sized apples that
makes about a half-gallon plus one pint. )
1 cup granulated sugar
1 cup light brown sugar
1 tablespoon ground cinnamon (I usually use two!)
½ teaspoon ground nutmeg
¼ teaspoon ground cloves
¼ teaspoon salt
1 tablespoon vanilla extract (I usually use two!)
10-15 drops of cinnamon oil flavoring (optional)

Directions:

1. Place apples in slow cooker. In a medium bowl, whisk together the sugars, cinnamon,
nutmeg, cloves and salt. Sprinkle over the apples and stir gently to combine. Cook on
low for 10 hours.
2. Stir in vanilla extract (and the oil flavoring, if you choose), breaking up any large
chunks of apples that remain. Cover and cook for an additional 2 hours.
3. Remove cover and use an immersion blender to puree the apple butter until
completely smooth. (Alternately, you could puree in batches in a food processor or
regular blender.) If you want the apple butter thicker, you can continue to cook it on low
with the lid off the slow cooker slightly ajar so that steam can escape.
4. Allow the mixture to cool, then spoon into jars and store in the refrigerator for up to 2
weeks, or freeze for up to 2 months. (NOTE: A half-gallon of apple butter, obviously is
a lot. It lasts for months in my refrigerator without spoiling, molding or anything!)